How I made a gasless NFT drop with Javascript only
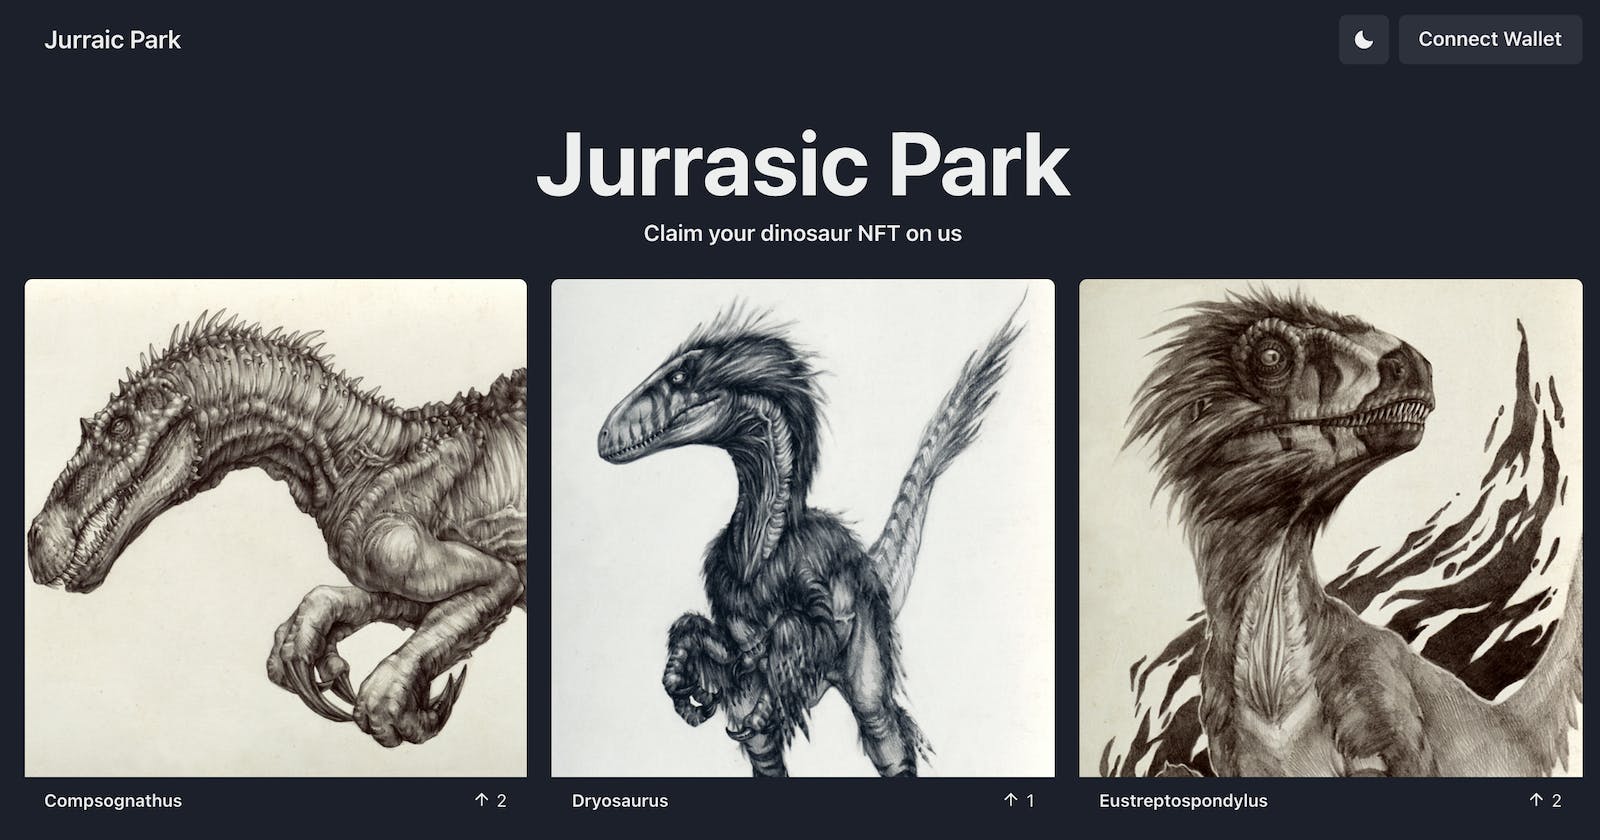
I made a project in which users can connect their crypto wallet to the Dapp. The users can then claim an NFT from a collection without paying gas


I am excited to share my recent DAPP project in which I explored meta transactions to allow users to perform blockchain transactions without paying for gas. This single-page DAPP displays a collection of ERC1155 tokens. Each token holds an image of a dinosaur and some metadata related to the species etc.
Disclaimer: The dinosaurs' information is not accurate at all.
Tech Stack
I used NextJs to make the DAPP and ThirdWeb handle smart contract logic. Feel free to go through the code in Github repo or try out the Demo.
What is ThirdWeb?
ThirdWeb is candy land for a javascript developer who wants to dive into web3 without having to learn Solidity. ThirdWeb provides many typescript-friendly SDKs. They have various modules for unique blockchain purposes. Developers can create a simple NFT drop or create their own DAO or a game.
The SDKs are very intuitive and continuously evolving to accommodate more and more functionality. Definitely check their documentation out these guides and join their discord. There are always some interesting conversations taking place that I learn a lot from.
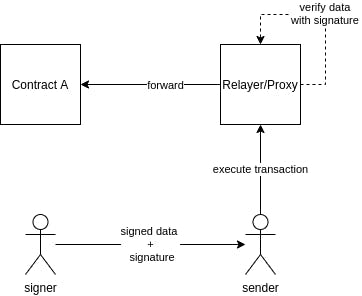
What are Meta Transactions?
Just like metadata is data about data, a meta transaction is a transaction type that the user can sign and execution of that transaction can happen from another wallet.
Here are some resources that can hopefully help understand this concept in-depth:
Setup ThirdWeb
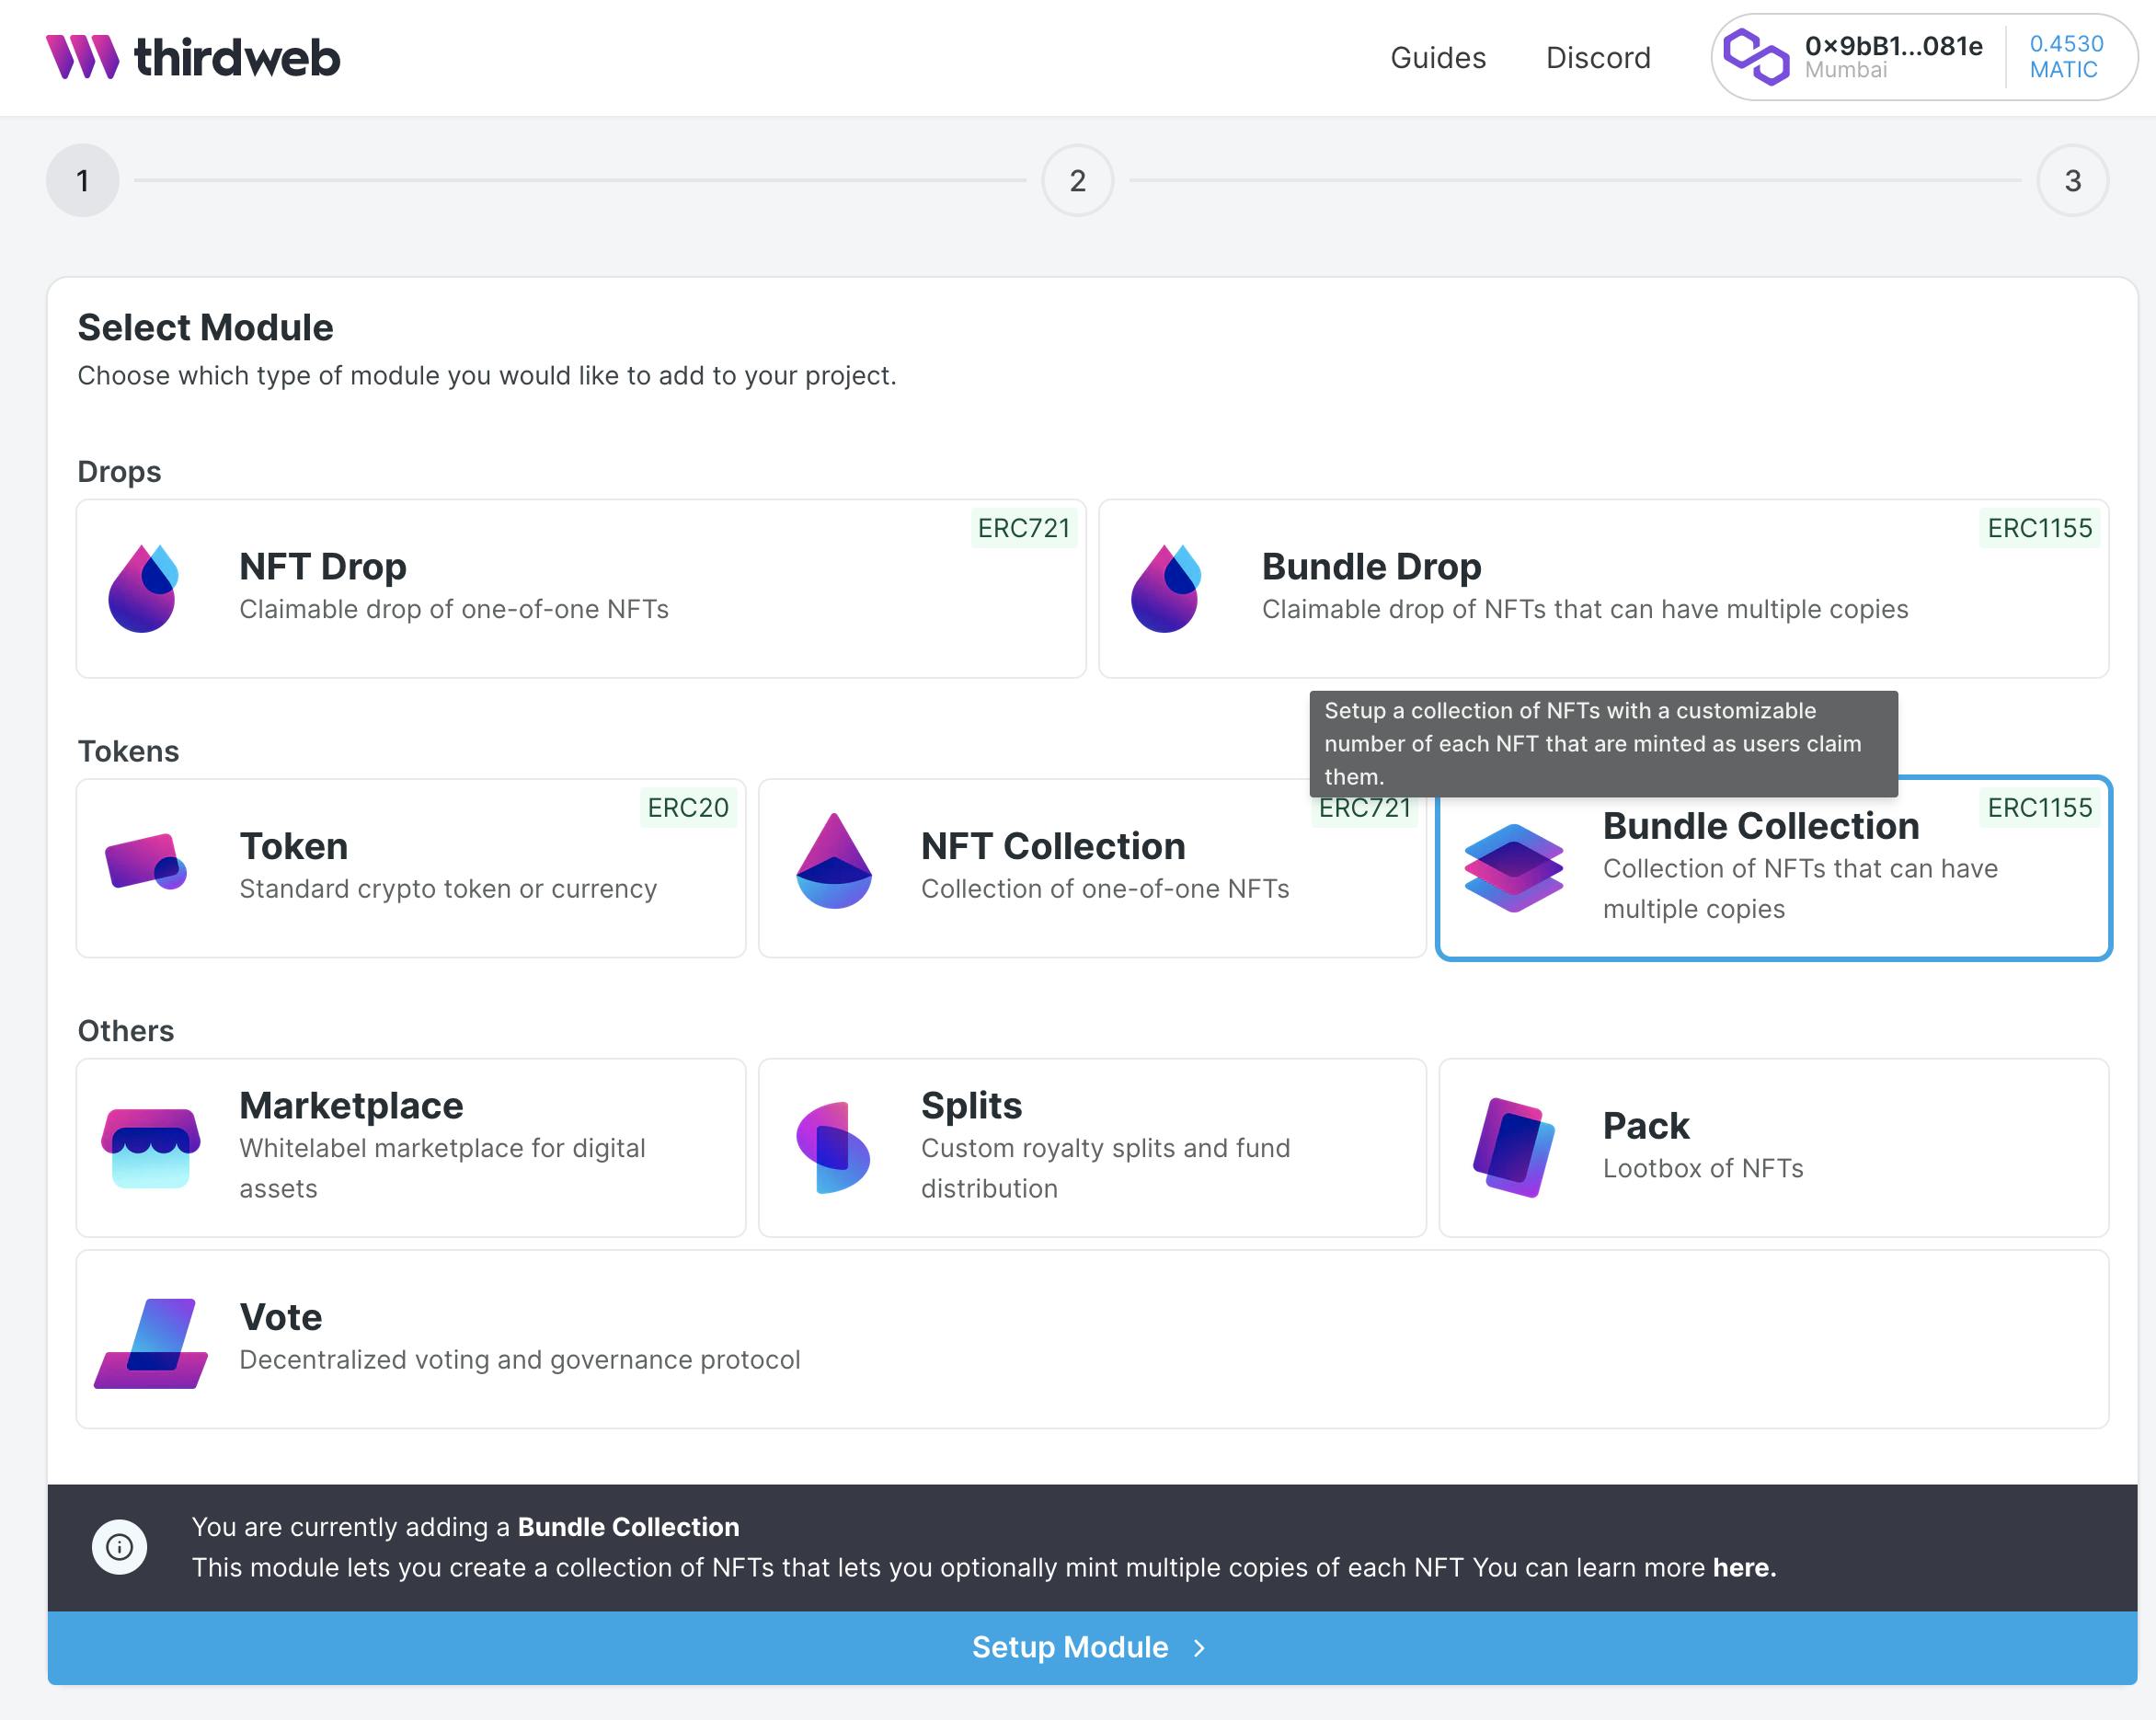
In order to start the project, I created a script that will create my ThirdWeb project. I chose to work with the Bundle Collection module.
Disclaimer: all the steps in the script can also be performed on ThirdWeb's beautiful GUI.
The script starts by creating an instance of ThirdWeb SDK. In the constructor, I pass the private key of my crypto wallet and a provider. The provider is where we get to set which chain we want to work with. I chose to work with Polygon Mumbai testnet and that's what rpcUrl is set to.
const sdk = new ThirdwebSDK(
  new ethers.Wallet(privateKey, ethers.getDefaultProvider(rpcUrl)),
);
Next, the script creates an app on ThirdWeb if there isn't one already created. The app is basically a project in which you can set up various modules for your purposes.
const app = await sdk.createApp({
  name: 'Jurassic Park',
  description: 'When dinosaurs rules the earth',
});
Next, the script creates a bundle drop module if there isn't one already created. This module acts as your collection on NFT marketplaces like OpenSea.
const bundleDropModule = await app.deployBundleDropModule({
  name: "Jurassic Park",
  description: "When dinosaurs rules the earth",
  image: readFileSync('scripts/assets/logo.png'),
  primarySaleRecipientAddress: ethers.constants.AddressZero,
});
Next, the script creates all the NFTs in the collection based on the metadata array.
const ids = await bundleDrop.createBatch(metadatas);
Next, the script will update the claim conditions for our NFTs. Simply put, claim conditions are a set of rules that define how many NFTs are in the supply, how many NFTs can be claimed in one transaction, etc.
In my case, I wanted my NFTs to have an unlimited supply, one NFT to be claimed per transaction and the sale to start right away. Hence the script sets the claim condition accordingly.
const claimFactory = bundleDrop.getClaimConditionFactory();
claimFactory.newClaimPhase({ startTime: 0, maxQuantityPerTransaction: 1 });

for (const id in ids) {
  await bundleDrop.setClaimCondition(id, claimFactory);
}
Finally, the script will claim one of each NFT to create a genesis token. If this step isn't performed, the NFT won't show on the market places.
for (const id in ids) {
  await bundleDrop.claim(id, 1)
}
That's all, after running the script our smart contracts are all set up and ready to consume. Crazy right? I am still amazed by the simplicity of their SDK.
Connect DAPP
In my NextJs app, I used web3modal to handle the connection to the user's crypto wallet. This library is one of many open source libraries that help with the wallet connection flow of the DAPP. I passed it network information in order to connect to Polygon Mumbai testnet.
this.web3Modal = new Web3ModalLib({
  network,
  cacheProvider: true,
  providerOptions: {
    walletconnect: {
      package: WalletConnectProvider,
      options: {
        infuraId,
        rpc: { [chainId]: rpcUrl },
      },
    },
  },
});
Once the modal is instantiated, we can trigger connection flow by calling the connect method. On success, it will return us the provider that we can then use to instantiate ethers.
const provider = await this.web3Modal.connect();
this.ethers = new ethers.providers.Web3Provider(provider as any, 'any');
Ethers library will help us get a Signer from the provider and pass it to ThirdWebSdk.
const signer = await Web3ModalService.ethers.getSigner();
const thirdWebSdk = new ThirdwebSDK(signer);
Now we can allow users to claim the NFT by calling the Bundle Drop module's claim method.
const module = thirdWebSdk.getBundleDropModule(moduleAddress);
await module.claim(nftId, 1);
However, the transaction isn't gasless yet. When the user triggers the claimed method, they will be charged a gas fee. Let's set up our gasless transactions next.
OZ Defender set up
I followed this very useful guide to set up an OpenZeppelin Defender.
Once the OZ Defender is set up, we can copy the webhook URL and pass it to ThirdWebSdk by using the transactionRelayerUrl option.
const signer = await Web3ModalService.ethers.getSigner();
const thirdWebSdk = new ThirdwebSDK(signer, { transactionRelayerUrl });
That's it, now the claim transactions are gasless.
Conclusion
Working with ThirdWeb was very frictionless and I found the SDK API documentation very useful. They have a great support team.